With 15 years of experience in .NET full-stack development and a year in networking, Sys-Ops, automation and infrastructure management, I recently took the “Decoding DevOps” course on Udemy by Imran Teli. This course offers a strong foundation in DevOps principles, covering key topics like cultural shifts, automation, and the tools that drive DevOps, such as Docker, Kubernetes, and CI/CD pipelines. It helps me identify gaps in my knowledge and also areas where I have improved/developed additional skills.
While Teli’s course provides excellent introductory knowledge, the rapidly evolving DevOps landscape and my practical experience highlight some areas where additional perspectives can be valuable. For example, newer tools and cloud-native services, like GitLab CI/CD and AWS DevOps Toolchain, are becoming increasingly important. I’ll also explore how the latest .NET updates (like .NET 7/8) and infrastructure-as-code frameworks like Terraform are enhancing DevOps practices for .NET developers.
Another core lesson from Teli’s course is the cultural shift required to successfully implement DevOps. While the course touches on this, I aim to expand on it by sharing my experiences bridging the gap between development and operations, especially in the context of modern development practices.
This blog series will not contradict Teli’s teachings but instead build upon them with real-world insights and tools. My goal is to enhance the learning experience for those transitioning into DevOps, particularly from a development background, and offer practical, actionable knowledge to help you succeed in this space.
TLDR; If you don’t want the story, just scroll through the titles and images.
I studied for and passed the CompTIA Network+ certification earlier this year. One of the points that many Redditors seemed to trip on, was remembering/recalling the 568A and 568B ethernet wiring termination scheme. So here’s a mnemonic of sorts that I hope will be useful. I didn’t develop the “GO” part but the rest is my own doing.
First, a reminder. You’re probably aware that the world steadily phased out half-duplex networks starting a couple of decades ago. Almost all switches and NICs today can auto-negotiate the half-duplex/full-duplex and RX/TX channels. Always, a Transmitter(TX) on one side should correspond to a Receiver(RX) on the other.
The half-duplex network required only two pairs of wiring. One pair for TX+, TX- and another pair for RX+, RX-. The full-duplex network requires four pairs of wiring. The communicating devices designate which pairs would act as TX and RX. Each pair, however, still has a positive(+) and a negative(-). Why this is so, I hope to quickly address in this post.
1 – Numbering the pins right
It’s just surprising how many people get this wrong. Part of the confusion with wrong numbering is in using just a silhouette/outline of the 8p8c(8 positions, 8 contacts) connector in diagrams. Ethernet cabling has codified the wiring schema as RJ45S. Coloquially we call it the RJ45 connector. Whatever floats the boat. I suggest visualising the 8p8c connector with the safety clip at the bottom and facing the pins. This makes it easy to remember the pin numbers ascending from left to right (same direction as we write Inglish).
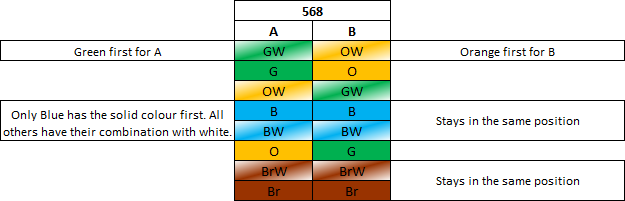
2 – Wire pair colours. GO Blue.
568A and then 568B use “GO Blue”. Green is the first for A. Orange is the first for B. Blue comes first and is the only colour to have solid first followed by its white combination.
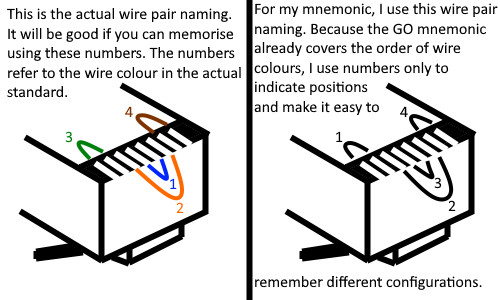
3 – Name the wire pairs
The correct wire pair names have a history to them. POTS needed only one wire pair to start with and used a 6p2c connector via registered jack RJ11 for a single telephone line. When a bridged telephone line needed additional power for two lines, another pair for power was added to the existing pair; thinking of this second pair wrapping around the first pair will help you. This now became the 6p4c connector via registered jack RJ14.
When “Ethernet” was designed as a protocol and it was time to develop standardised equipment with future considerations, it would’ve sufficed to repurpose 6p4c for digital communication between two devices but WHAT IF additional power or signalling was required for each of the existing pairs in the future? Ergo 8p8c via RJ45S. 8p8c via RJ48 and RJ61 were already used for telecom networks at the time and it just made sense to use the best and highest standards of existing telecom equipment as a starting point for ethernet.
There’s a standardised wire pair naming as a result of this history. Pair 1 is the innermost, pair 2 is around pair 1. Pairs 3 and 4 are on either side of 2. Pair 3 is to the left of 2. Pair 4 is to the right of 2.
But, because we’ve got the GO Blue mnemonic already, we can disassociate the colour and pair name to use our own pair name for the convenience of learning the colours in different configurations. This is only a convenient mnemonic, not a standard.
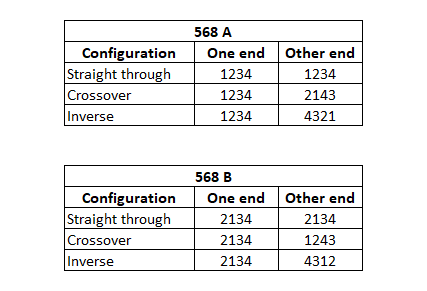
4 – The different configurations
At this point, you only need to follow some simple patterns. For half-duplex networks only ST and XO pairs 1 and 2 are relevant.
Inverse/yost/rollover/console cable is used for a very specific purpose and is probably stored in a vault.
5 – TX and RX, + and –
This also has to do with the history of telephony and POTS but it’s important to note there are different pairs for half and full duplex.
1GbE NICs and above auto-negotiate(auto MDI-X) and are full-duplex by default. So even if one end is running an old 100baseTX half-duplex, having an MDI-X port at the other end won’t hurt. Knowing the wiring just makes it easy when we’re troubleshooting.
This isn’t a religious or spiritual piece. But I know there are parallels in those spheres that can’t be sufficiently explained in words or thoughts with a reasonable sense of fulfillment.
So I’m going to make it short and hopefully write this one like a drop of sandalwood oil on a diffuser stick.
I have made many choices in my life, some impact only me and some impact my near and dear ones. Not all of them ended up with consequences that I imagined them to have. So there’s regret and frustration. But even under all that, is an unfulfilling feeling of guilt. Guilt that my choices have consequences that impede the choices others can make. This guilt is at the pits of my stomach. It makes me aware of its presence when I start thinking of moving to another locality to save some money on rent, but will also impact the school my children attend, and thereby the company they keep. It reminds me of already having deprived them from the doting and pampering affection of their grandparents when I moved to a different place for better education and job prospects-for myself. This guilt bullies me to find meaning and purpose.
In the choices and consequences that gloriously failed, there is also a thin silver lining that shows me the people who have stood by me. Allowing me to make those choices. Giving me a sense of safety and liberty. It warms and sweetens my experience of every interaction. It is an ever-present foundation that was laid by my parents when they were educating me through the trials and tribulations of life. It is a gift that keeps on giving and empowers. Gratitude is that gift which encourages me to stay the course of discovering my own meaning and purpose.
To many of you, the first story I’m about to reference, might be familiar as being in the “Panchatantra” or “Jataka tales”. Let me tell you, it is from the 24 stories set in social-morality that vetala (a goblin/spirit) recited to King Vikramaditya and tested his wise judgement. In Sanskrit, Panchavimshati means 25. The 25th story is the narrative and complication within which the other 24 stories are set like jewels.
The moral conundrums posed by vetala are nothing new to my generation of kids who grew up watching them on doordarshan or read the Jataka/Panchatrantra stories that frequently referenced them. Somehow, not many in the next generation have been introduced to them. I strongly encourage you to read these stories and relay them to your children. Discuss them with your parents and community because we need to preserve some semblance of structure, morality, civility and self-esteem for our children’s generations. Amazon link to buy a book.
Smartest of the four brothers?
The story loosely goes like this…. A brahmin couple had 4 kids and some very nasty greedy relatives. After the father’s death, the relatives usurped his wealth, sparing nothing for his children. The four boys, educated as they were in different mantra, tantra and shastra, decided to make it big when a nearby king sought the counsel of learned men. One of the brothers wasn’t as academically bright and incisive as the others, being only useful in menial vocational jobs, but they decided to take him also with them.
Enroute to the king’s court, they stumbled on a pile of bones. The three brilliant educated and eager brothers thought this was a grand opportunity for each of them to exemplify and outshine the others. So the first used his knowledge to reorganize the bones in the right manner. The second used his knowledge to enclose them in skin, flesh and fur. The third brother proclaiming to have the highest knowledge to restore life, was just about to do it when the fourth stopped him and warned of the impending danger that a hungry wild lion could pose. Drunk in their knowledge and power to undo nature, the other three bullied him. So he climbed a nearby tree and settled carefully on a strong branch to observe what was to happen.
No sooner than the fourth brother settled, the third brother brought the lion back to life. The beast sprung on the three and killed them in one slash of its paw. The fourth brother unable to stop his brothers and also unable to act swiftly to stop the lion, watched with pain and horror as the lion devoured the three to satisfy its hunger.
Crusts
This second story I refer, is “Crusts” a children’s book by Danny Parker. It has a very powerful undercurrent that establishes the pattern of learning/development. The story is about some aliens living on a planet made of crusts. For some reason their planet is crumbling away and they need planet loads of crusts to save themselves. The protagonist is a playful kid who doesn’t like to eat the crusts on his breads but uses them for other purposes.
The aliens initially think they can rely on this kid to provide all the crusts they need to save their planet. However, the kid doesn’t seem to go with their plan. He plays with his crusts, makes useless art or menial garnen tools with them. All the while, it is clear as the story progresses, that the kid is developing a deeper understanding of different types of crusts and their specialized uses to address specific concerns.
Just when the aliens drop all hope and return to their planet, the kid makes a giant rocketship using just crusts, loads it with even more crusts and takes it across space to save their planet.
The story beautifully illustrates the preferred stages of learning a new skill or tool. Play, experiment, use it to express the mind, employ it to solve problems.
Matthew 5:5
You can read exactly what I’m referring to, over here.
These stories and thoughts have fused in my mind, and I can’t stop seeing the patterns that have played out on use, misuse and abuse of stones, metals, gun powder and information technology over the several millennia of human existence.
I installed Fedora 36 because that’s the highest explicitly stated version of Fedora on VirtualBox’s download page.
After installing Fedora, I updated all packages using dnf and jumped straight into installing VirtualBox.
Sure, to reduce the update package size I could’ve uninstalled Boxes, LiberOffice, etc, etc. But I didn’t want to corrupt the environment with unknown modifications that these changes could lead to.
By the end of this article:
We’ll have a running VirtualBox setup on Fedora 36. Fedora 36 as the host is the key here.
You will be able to use the steps and process discussed here, along with the additional reading links to undertake this setup on other distros as well.
Before installing the package, ensure all packages on the host are updated.
$ sudo -i
Enter your password if prompted
# dnf update -y
Now install the downloaded rpm. The file was downloaded without root profile so change to the appropriate Downloads folder. Mine is ksk. Make the necessary substitutions below.
You’re likely prompted to add the user to “vboxusers” group. This should be the user who’ll launch Virtualboxes.
# gpasswd -a <user> vboxusers
Check that the user is added to vboxusers:
# id <user>
uid=1000(ksk) gid=1000(ksk) groups=1000(ksk),10(wheel),976(vboxusers)
If you get a message stating the system is currently not setup to build kernel modules, some additional packages need to be downloaded. It is unlikely that you can proceed without addressing those errors first.
Let’s go through them one by one.
This system is currently not set up to build kernel modules.  Please install the Linux kernel "header" files matching the current kernel for adding new hardware support to the system.
The distribution packages containing the headers are probably:
     kernel-devel kernel-devel-6.2.15-100.fc36.x86_64
There were problems setting up VirtualBox.  To re-start the set-up process, run
  /sbin/vboxconfig
as root.  If your system is using EFI Secure Boot you may need to sign the
kernel modules (vboxdrv, vboxnetflt, vboxnetadp, vboxpci) before you can load them. Please see your Linux system's documentation for more information.
So that’s helpful. Install “kernel-devel” . While installing this, you’ll notice dnf also downloads and installs the appropriate kernel version development package.
# dnf install -y kernel-devel
If the kernel header build error came up, you’ll have to restart the virtual box setup process by running the suggested script. First things first, let’s do that and see how far we can go.
Change to /sbin and execute that script the previous error was talking about.
# cd /sbin
# ./vboxconfig
On my system, I got this error after running the script. A new error means we’ve moved something in the universe, hopefully in the direction we want things to go:
[root@Unknown sbin]# ./vboxconfig
vboxdrv.sh: Stopping VirtualBox services.
vboxdrv.sh: Starting VirtualBox services.
vboxdrv.sh: You must sign these kernel modules before using VirtualBox:
vboxdrv vboxnetflt vboxnetadp
See the documentation for your Linux distribution..
vboxdrv.sh: Building VirtualBox kernel modules.
vboxdrv.sh: Signing VirtualBox kernel modules.
vboxdrv.sh: failed:
System is running in Secure Boot mode, however your distributiondoes not provide tools for automatic generation of keys needed formodules signing. Please consider to generate and enroll them manually:
sudo mkdir -p /var/lib/shim-signed/mok
sudo openssl req -nodes -new -x509 -newkey rsa:2048 -outform DER -addext "extendedKeyUsage=codeSigning" -keyout /var/lib/shim-signed/mok/MOK.priv -out /var/lib/shim-signed/mok/MOK.der
sudo mokutil --import /var/lib/shim-signed/mok/MOK.der
sudo reboot
Restart "rcvboxdrv setup" after system is rebooted.
There were problems setting up VirtualBox. To re-start the set-up process, run
/sbin/vboxconfig
as root. If your system is using EFI Secure Boot you may need to sign the kernel modules (vboxdrv, vboxnetflt, vboxnetadp, vboxpci) before you can load them. Please see your Linux system's documentation for more information.
Deconstructing this isn’t difficult. They’ve also given the script to follow.
The ‘roadblock’ is caused by the UEFI running secure boot. There are actually two ways to solve this. Unfortunately for you, I’ll be doing the difficult but right thing here. If you don’t know what the UEFI does, there are some great videos on youtube that can tell you what the UEFI is, how it is better than BIOS and all the nitty-gritties. Depends on how far down the rabbit hole you want to go.
First, let me tell you what the easy but wrong solution is: Disabling Secure boot on your UEFI. How? Restart your system, go into UEFI (you’ll need to hit F1/F2/F12/Del depending on your hardware) and disable Secure boot.
The right thing to do… We’re going to make the UEFI trust the signatures generated here for virtualbox. We need to let mokutil know what those signatures are and hand hold the OS into launching a self-signed bootloader (that’s more on-the-side jargon if you’re interested). First step, make the Machine Owner Keys (MOKs).
Install mokutil, openssl and make a directory for these shim-signed certs. Make the CSR(MOK.der), private key (MOK.priv). Don’t change the file names.
# dnf install -y mokutil openssl && mkdir /root/shim-signed && cd /root/shim-signed
# pwd
/root/shim-signed
# openssl req -nodes -new -x509 -newkey rsa:2048 -keyout MOK.priv -outform DER -out MOK.der -subj "/CN=Virtual_Box/" -addext "extendedKeyUsage=codeSigning" -days 36500
---____+++***+++----
# ls -lah
[root@Unknown shim-signed]# ls -lah
total 8.0K
drwxr-xr-x. 1 root root   34 Jun  5 14:54 .
dr-xr-x---. 1 root root  208 Jun  5 14:51 ..
-rw-r--r--. 1 root root  808 Jun  5 14:54 MOK.der
-rw-------. 1 root root 1.7K Jun  5 14:54 MOK.priv
If for any reason the file isn’t owned by root and doesn’t have ‘rw’ for root, you need to run chmod and chown to make that happen.
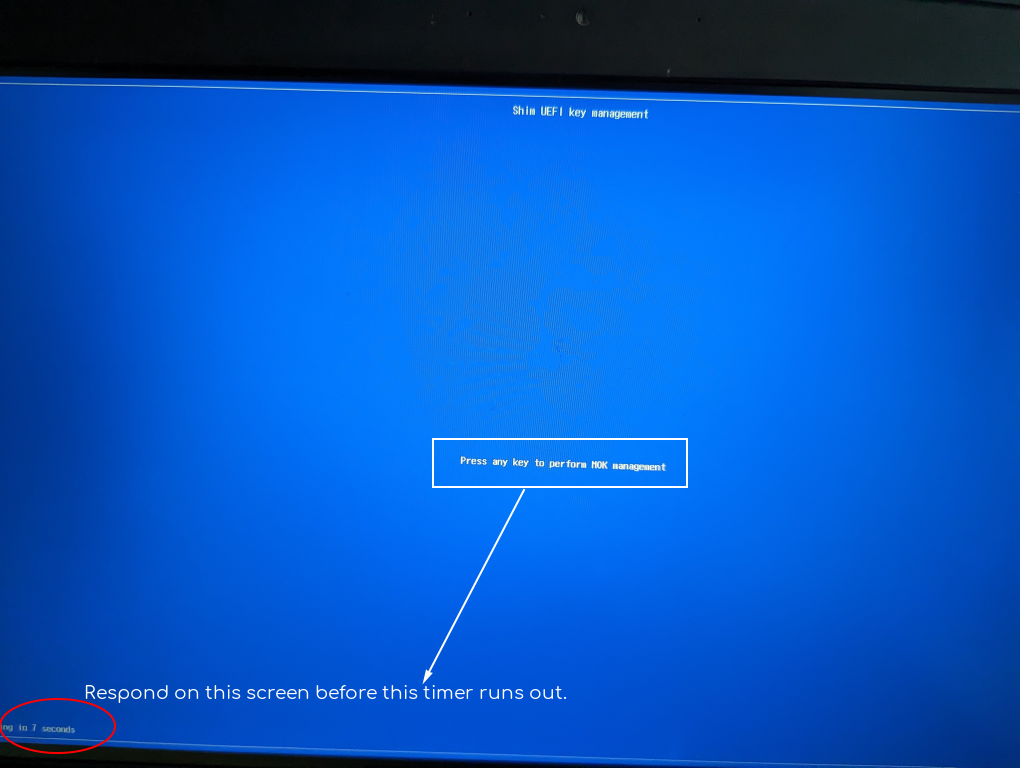
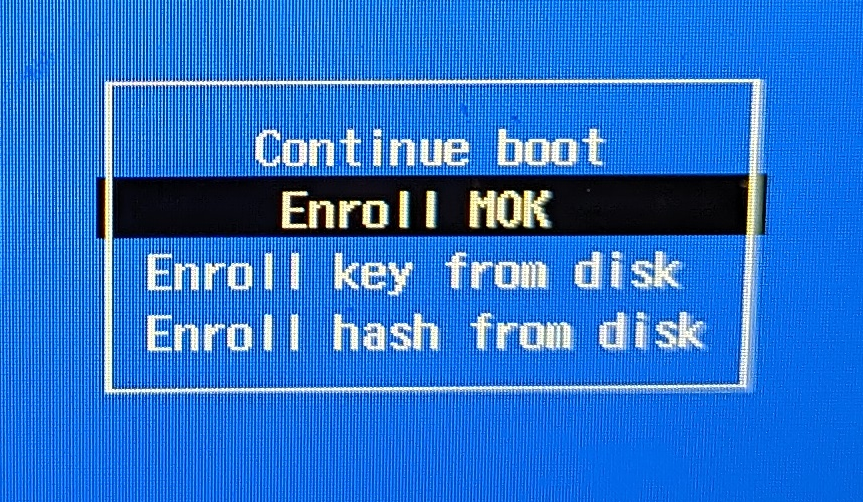
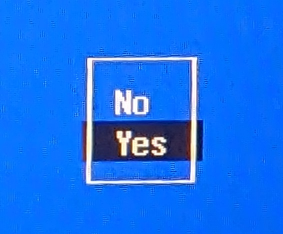
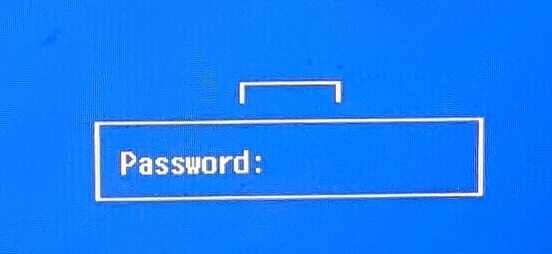
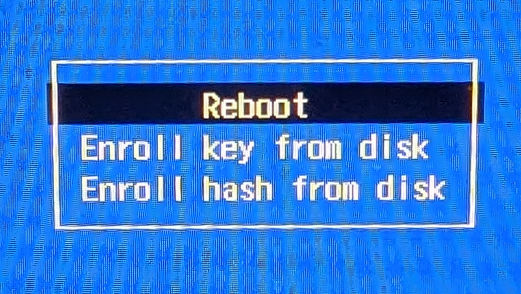
In the next step, you need to set a password to import the certificate. Once this is done, reboot the system. A blue screen appears with the mokutil menu. Enroll the vbox. Continue. Enter the same password now. Proceed to reboot. You’ll notice below, even though I’m logged in root profile and the shell indicates with ‘#’, I have used ‘sudo’ to ensure there’s no error at this step. Also, don’t take a quick-break here… you’ll see why.
Hope all those pics helped. Next, to ensure you can sign this shim-signed module, we need to make a script. This involves some information that I’ll first lay down.
What’s the information we have about the VirtualBox Driver module that we’re signing with this certificate? Let’s see:
[ksk@Unknown ~]$ modinfo vboxdrv
filename:    /lib/modules/6.2.15-100.fc36.x86_64/misc/vboxdrv.ko
version:     7.0.8 r156879 (0x00330004)
license:     GPL
description: Oracle VM VirtualBox Support Driver
author:      Oracle and/or its affiliates
srcversion:  10CD228066F55AEAC05423A
depends:
retpoline:   Y
name:        vboxdrv
vermagic:    6.2.15-100.fc36.x86_64 SMP preempt mod_unload
parm:        force_async_tsc:force the asynchronous TSC mode (int)
We need to sign vbox*.ko with our certificate. Notice here, the three modules vboxdrv, vboxnetadp, vboxnetflt inside that folder aren’t signed. How do I know? I’ll show you after a few steps. And this “signing” needs to happen as root user after every system update. I won’t go into automating it at this time. Just know this exists and should be executed after every system update.
We need to use sign-file. On my system, it is located at /usr/src/kernels/6.2.15-100.fc36.x86_64/scripts/sign-file. How do I know? I used ‘locate’. Because this is a fresh system, first update the mlocate database so that the tool can do its job.
See all the additional information about the signature now? So we’ve finished signing vboxdrv and the other two files. Let’s resume that setup.
[root@Unknown shim-signed]# rcvboxdrv setup
vboxdrv.sh: Stopping VirtualBox services.
vboxdrv.sh: Starting VirtualBox services.
vboxdrv.sh: You must sign these kernel modules before using VirtualBox:
  vboxdrv vboxnetflt vboxnetadp
See the documentation for your Linux distribution..
vboxdrv.sh: Building VirtualBox kernel modules.
vboxdrv.sh: Signing VirtualBox kernel modules.
vboxdrv.sh: failed:
Thought we’ve finished signing vboxdrv and restarted the setup!! What went wrong? We get the same error about system in secure boot and signing those 3 modules.
Closer inspection shows that the MOK need to be on /var/lib/shim-signed/mok directory. Let’s create that structure and copy the CSR, private key and script over to the expected path.
So finally, no errors. If you’re looking for some more light reading on this matter, there’s an excellent article on debian wiki, almost all of that is relevant for Redhat+ distros as well: https://wiki.debian.org/SecureBoot
That went well!!! Just before you think we’re done….
Now to ensure SELinux doesn’t throw any errors while launching VirtualBox, you’ll have to allow using VirtualBox by setting the “use_virtualbox” flag. Simple.
# setsebool -P use_virtualbox 1
Reboot the OS to proceed.
I’m guessing you’ve rebooted and launched the terminal again. Switch into sudo as current user’s login shell. Check if the use_virtualbox flag has been set.
$ sudo -i
# getsebool use_virtualbox
use_virtualbox --> on
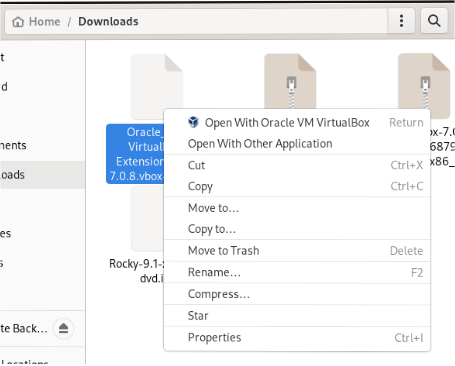
Let’s install the virtualbox extention pack. This has the benefit of allowing disk encryption on your VMs, PXE boot (which will come in handy for network installs), etc. Get the “All supported platforms” one for the version of VirtualBox you downloaded. This goes into the ~/Downloads directory as well. Just open with Oracle VM..
This series “Digital security” is from my notes prepared for certifications.
Certificates are linked to “Identity” by leveraging the security of digital signatures(asymmetric key cryptography and hash functions).
A certificate has following information:
Subject’s name and public key (Who the certificate is issued to)
Issuer’s name and signature (Who issued the certificate)
If the issuer and subject are the same entity, the certificate is considered to be self-signed. These are good for development or internal/local uses where secure applications require certificates within the network.
Over the internet, there are security firms that issue certificates. These are often called the Root Certification Authority (Root CA).
The Root CA don’t directly sign all the domain/server/vanity certificates. The Root CA create multiple intermediate CA who then sign the end user certificates.
This mechanism of chained trust to authenticate a host/client over the network is known as Public Key Infrastructure(PKI).
Web browsers by default, have a certificate store which contains the certificates of many Root CA and intermediate CA.
In addition to browsers, application servers (IIS, Tomcat, NGINX, etc) have their own collection of certificates to trust incoming client or outgoing server connections.
In addition to these specialized applications (Browsers and App servers), the operating systems has its own certificate store used by client applications (Skype, Office, 7Zip, Fiddler, Postman, etc).
Inspecting a certificate will show that the certificate was most likely issued by an intermediate “Issuing Authority”. Below screenshot was taken by importing certificate of www.airbnb.com and all certificates in its chain of trust.
The certificates were analysed on 28/03/2023. The end user certificate had expired at this point.
The Root CA’s public key is hashed and that hash is encrypted using Root CA’s private key. This results in the Root CA’s signature.
The Root CA’s public key and signature are then shared to the public. Anyone who wants to validate the public key and also authenticate the sender, can verify the signature.
Root CA’s self signed certificate contains Root CA’s public key and Root CA’s signature.
Root CA’s signature is then attached on Intermediate CA’s certificate, along with Intermediate CA’s public key. Intermediate CA generates its own signature using its public and private keys.
End user’s certificate will contain Intermediate CA’s signature, end user’s public key.
To validate end user’s certificate, we validate the end user signature using the end user certificate’s public key. This leads us to validate Intermediate CA’s signature.
The browser/web-server/OS might have Intermediate CA’s public key which can be used to validate that Intermediate CA’s signature. This leads us to validate the Root CA’s signature.
The Root CA’s public key SHOULD BE available at the client’s browser/web-server/OS in order to validate the Root CA’s signature.
The chain of trust will stop there because Root CA’s certificate is self-signed.
Below image from wikipedia:
Digital signature, Certificates, SSL/TLS are a layer 4+ mechanism to ensure confidentiality, integrity and authentication.
This series “Digital security” is from my notes prepared for certifications.
Asymmetric key cryptography can be used for the purpose of message signatures because:
The fact that only a public key pair of a private key encrypted message will work, means that the message was encrypted by the owner of the private key. The owner can be uniquely authenticated as a fact of owning the private key.
The fact that the public key can’t be used by a nefarious actor to encrypt a message and later be used again by another downstream legitimate user to decrypt it, ensures the integrity of the message and security in authenticating the message.
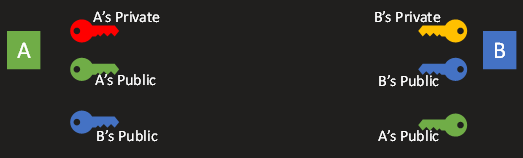
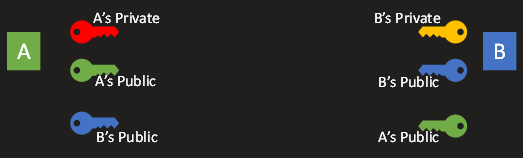
Step 1: A and B generate their asymmetric key pairs.
Step 2: A and B share each other’s public keys.
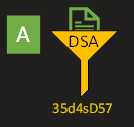
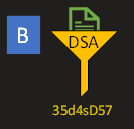
Step 3: A generates a hash digest of a message using DSA and then encrypts that digest using its private key.
Step 4: A sends the message appended with the encrypted digest to B.
Step 5: B decrypts the appended ciphertext using A’s public key and retrieves the digest. This proves that the digest was encrypted by A using its private key.
Step 6: B then attempts to generate the same digest for the message using the pre-agreed algorithm (mostly DSA).
This proves to B that the message has retained its integrity and wasn’t tampered with in the journey from A to B.
So what’s a digital signature?
In the context of files shared between server and client, it can be the a pre-shared hash of the file. The hash might be in a common location where only the admins can update the hash information.
In the context of SSL/TLS certificates, the public key of one server is already shared with anyone who wants to communicate with that server. So all the tentative clients have that public key. Going by our example, A’s public key is available to B. The public key is just a series of bytes. So A can treat its public key as the message and generate it’s digest. A will encrypt the digest using its private key. The resulting ciphertext is A’s digital signature.
Read the steps again and it might be more clear now.
This series “Digital security” is from my notes prepared for certifications.
Encryption deals with the process of substituting plaintext with ciphertext.
The reverse of encryption seeks to generate the plaintext from the ciphertext.
If it was enough to validate the equality or just to identify a common message between two parties, encryption is not necessary.
A hash algorithm performs a mathematical operation on the entire data(plaintext) to generate an output(digest) that is much smaller than the input.
In many cases, the output size is only a tiny fraction compared to the original data. Unlike encryption, hashing is irreversible.
A hash/digest is a fingerprint of the original message.
If some data was commonly known/shared to two parties, then they only need to agree on a common hashing algorithm to check if both had the same data.
Well known hash algorithms:
MD5(Message Digest Algorithm) was the most common hash algorithm,
SHA(Secure Hash Algorithm)-1, SHA-3 produce 160 bit digest.
SHA-2 has 6 variants of varying digest size:
SHA-224 : 224 bit digest
SHA-256: 256 bit digest
SHA-384: 384 bit digest
SHA-512: 512 bit digest
SHA-512/224: 512 bit digest truncated to 224 bits.
SHA-512/256: 512 bit digest truncated to 256 bits.
DSA (Digital Signature Algorithm) is used exclusively for the purpose of signatures and certificates.
MD5 and SHA-1 have been compromised and are not preferred in security/signature applications. They’re still used to verify data integrity in non-trivial use cases.
Passwords are stored only as a digest of the original password. This prevents any user from reverse engineering the digest.
This series “Digital security” is from my notes prepared for certifications.
Asymmetric key cryptography is processing intensive and is suitable only for small bits of data.
Symmetric key cryptography is not expensive (on processing) and can be used to encrypt a very large bulk of data.
Using symmetric key cryptography, ciphertext is as long as the plaintext.
Using asymmetric key cryptography, ciphertext is much longer than the plaintext. Due to this expansion, bulk encryption using asymmetric cryptography is not feasible. This data size difference will translate to processing speed differences which will go on to impact the network’s throughput.
A middle ground in security and performance is achieved by using asymmetric keys to securely share the symmetric keys.
Step 1: Both parties generate their private and public key-pair.
Step 2: Both parties exchange each other’s public keys.
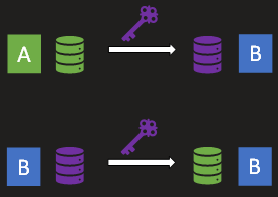
Step 3: ‘A’ wants to send a large amount of data to ‘B’ so it prefers to use symmetric key encryption. ‘A’ encrypts a newly generated symmetric key with B’s public key. B then uses its own private key to decrypt the data and retrieve the symmetric key generated by A. Now the symmetric key has been shared securely over the network.
Step 4: When A wants to send a large bulk of data to B, A encrypts the bulk data with the symmetric key which was previously shared with B. B decrypts the bulk data using the same symmetric key.
B can use the same symmetric key to encrypt and send data to A.
SSL, TLS, Certificates. IPSec and SSH use SSL which leverages hybrid encryption.
This series “Digital security” is from my notes prepared for certifications.
If the key of a Symmetric-key algorithm is compromised, a malicious actor can sniff on all the encrypted traffic.
An algorithm that doesn’t require the same key to be shared by both parties to encrypt and decrypt data is an Asymmetric-key algorithm.
A key-pair is generated by one party A. This key-pair has two keys that are mathematically linked together. A retains a key (which is then called the private key).
The other key is called a public key and it is shared with everyone, including the other party B with whom secure communication is desired.
B encrypts a message using the public key and sends it back to A.
Even though everyone else other than A and B have the public key, they can’t decrypt the message.
The message can only be decrypted using the private key which is only with A.
Step 1: Both parties generate their private and public key-pair.
Step 2: Both parties exchange each other’s public keys.
Step 3: A encrypts a message using B’s public key and sends that to B.
Step 4: B decrypts the message using their private key to get A’s original message.
Similarly, B can encrypt a message using A’s public key which is then decrypted by A using their private key.
Once a party encrypts a message using the public key, only the corresponding private key can decrypt the message.
If the private key is compromised, all messages encrypted by the paired public key can be decrypted using it.
If a public key is compromised, false encrypted messages can be sent to the owner of the paired private key.
If one keys in a key-pair encrypts a message, only the other key in the key-pair can decrypt it.
The same key that encrypts a message, can’t decrypt it.
RSA(Rivest, Shamir, Adleman), DSA(Digital Signature Algorithm) and ECDSA(Elliptic Curve DSA) are most common asymmetric cryptographic algorithms.